The paved road suddenly came to end as crushed gravel began to crunch beneath the wheels. The car came to a dead stop at the foot of the driveway. Just ahead, shrouded in the fog of a gloomy October afternoon, appeared to be a graveyard with three moving figures. Emerging from the mist was a hooded figure carrying what appeared to be a sickle. Behind, another materialized from the hazy shadows. A raunchy old hat obscured the face and the long trench coat was tattered and muddy. Trailing behind on the ground was a skeleton being dragged by the neck from the mist-laden graveyard. No, an unsuspecting driver didn’t just pass into an otherworldly experience. He just traveled to far on a dead-end street that becomes my driveway where the street ends. What he actually witnessed was the setup of our life-size graveyard for Halloween being completed. The “sickle” my mother was carrying was a tree trimmer and I was dragging a plastic skeleton on the ground that we had decided not to use in the display.
You can create the same eerie experience for Trick-or-Treaters in your yard by using some very simple ingredients. No swamp water or eye of newt is required for this spell. Plywood and paint are the basic ingredients for working this magic trick that is easier than you may think.
We had the lumberyard cut a 4’x8′ sheet of 1″ thick plywood into eight sections measuring 16″x24″. The thick wood was used to approximate the girth of old gravestones, but you can use a thinner, less expensive, piece of plywood as well. Using some photos of old cemeteries as an example, we drew decorative tops on the pieces of wood and cut out the designs with a jigsaw and sanded all parts smooth. You can leave the tops straight, or for a simple treatment, cut the top in a semi-circular pattern (use a large plate or compass to draw the arc).

To get a stone-like effect, three shades of gray exterior house paint were used. A primer coat was applied to all sides in the darkest charcoal shade of gray. When dried, we used a piece of sea sponge to randomly sponge on a medium shade of gray flat paint, followed by another very gentle sponging using the lightest shade of gray flat paint. We did front, back and sides so that it would look as nice from the back as the front since our neighbors would be seeing the back of the graveyard.
When it came time to do the writing on the stones, we took a somewhat involved route to get a realistic effect. You can do it very simply though by painting names, birth and death dates, and spooky sayings on your stones with an artists’ paintbrush and black flat exterior paint. If you want to spend a little more time on the project, you can do some very creative things with your computer to create “stencils” that will produce eerily realistic “engravings” on your stones.

Using various fonts, we created templates in a word processor of what we wanted the finished printing to look like. For names, a font size of 160 worked well and 72 was sufficient for dates and other inscriptions. Experiment with it until you’ve found proportions that you like. Once we were satisfied, the text was printed out on card stock and then cut out with an Exacto knife. The cutting process was time-consuming because we had chosen fonts with a lot of detail. In addition to printing out text, we also used various pieces of clipart that could be enlarged. A crescent moon, skull and bat made for a great decorative touch above the names on the stones.
After many hours of painstaking cutting, we used black flat exterior paint and a stencil brush to transfer the text and images onto the stones. The cardstock templates were positioned where we wanted the engravings to be on the stones and we secured them in place with a couple of pieces of masking tape. Using the stencil brush, we painted twice by lightly dabbing the paint on and allowing 5 minutes between coats. We avoided a brushing motion so that the paint would not run behind the stencil and smear. Touch-ups were done with a small artists’
paintbrush.
To stand the gravestones up we installed two small eyehooks on the lower third of each gravestone about 6″ apart. At the hardware store we bought 24″ long metal rods that were slightly smaller than the opening in the eyehooks. The rods were hammered into the ground about 12″ and then the gravestones’ eyehooks were slid down the rod. They didn’t stand perfectly straight, but then they weren’t supposed to.

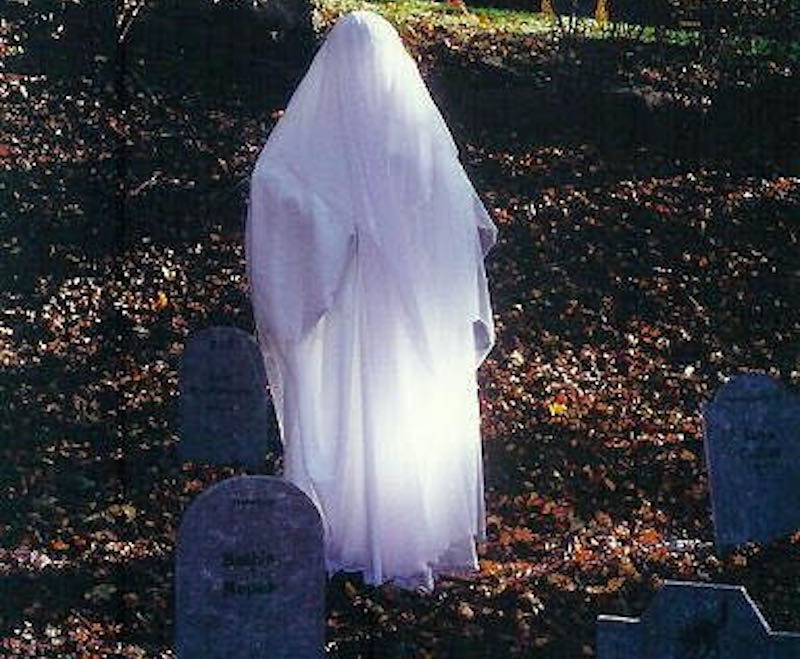
To complete the scene, we constructed a life-sized ghost. We began by pounding a 1” thick, seven-foot long bamboo stake into the ground about a foot. A hole was bored into a 10” Styrofoam ball so that it could be easily, but firmly, attached to the top of the bamboo stake.
To form the body, we filled a white, lightweight, weatherproof jacket with plastic sheeting from the hardware store. The top of the jacket was wired onto the bamboo just below the Styrofoam at the neckline. The arms were positioned as if they were reaching out to someone and wired into place.
Eight yards of two different types of white fabric completed the figure. The first piece was polyester with a nice sheen and flow. Four yards were draped over the head front-to-back and four yards side-to-side. At the arms, the fabric was pulled in and wired so you could see the arms extending out from the figure. The top layer of fabric was a translucent sheer-type fabric and was draped in the same manner, but not wired. It was attached by inserting several floral pins into the top of the head so all parts of the fabric would be free to blow in the wind.
However simple or complex you make your graveyard, the results will be frightfully chilling. In the waning hours of daylight, the free-flowing nature of the ghost adds wispy movement to your display that will make any passerby take a second glance. On a gloomy October afternoon, don’t be surprised if an unknowing stranger happens upon your yard by mistake and witnesses in awe and terror the unnatural apparition and gravestones emerging from the mists.


